Making and Processing a Black and White Image–Part II
St Eloi Church Theriot, Louisiana
Image Analysis
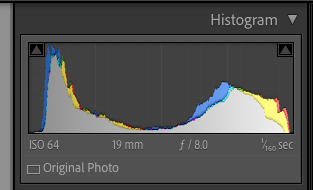
The next step in the process is to examine each image, and select a processing strategy. The first step is to view the histogram of each image. The best image will be where the information is as far to the right as possible without clipping the highlights. As shown in the figure below, the middle image shows clipping when the exposure is adjusted, but the next one to the right has a good histogram when the exposure slider is adjusted to reduce the exposure by one-half stops.
Bracketed Image Capture
Histogram of next to last image
I'm using Lightroom to do these checks and to make the initial cleanup adjustments. As you can see, the histogram is clipped neither in the shadows or the highlights. With a clipped image in both shadows and highlights due to too much contrast, I would have considered using HDR techniques or masking the sky and replacing it. I then checked the box for Chromatic Aberration in the Lens Correction Panel, and it removed some noticeable fringing in the image. Next, I checked the image for noise, and I added a bit of noise reduction and a small amount of sharpening. Finally, copying the adjustments to the second image in the series allows me to make a mask for a brighter cross in the final version.
The noise in the image's shadows was almost non-existent due to carefully selecting the correctly exposed image and the low ISO of 64 used for the shot. For noisy images, I would have used a third-party noise reduction application such as Topaz DeNoise AI.
My next step is to play with the adjustments and look for characteristics of the image that I can leverage in the final Black and White version. I also looked for problems for correction. Then, I noticed that by bumping up the dehaze value, I could accentuate the bright center of the image in the final version. At this point, I also saw light rays radiating from the illuminated area of the image. So again, I synchronized the settings to the brighter image I will use to brighten the cross.
Color image ready for black and white conversion
Part III will cover converting the image to black and white.


